Menu
Form Fields
These are the fields and UI elements that are shown in this form, along with a describing text and explanation about their usage in the application.
File
Creates a new empty project. In case of the current project not being saved (modified), the program will ask for saving it before discarding and resetting everything. It is important to understand that it is possible to store several heat transfer calculation within a single project (using Project Processes).
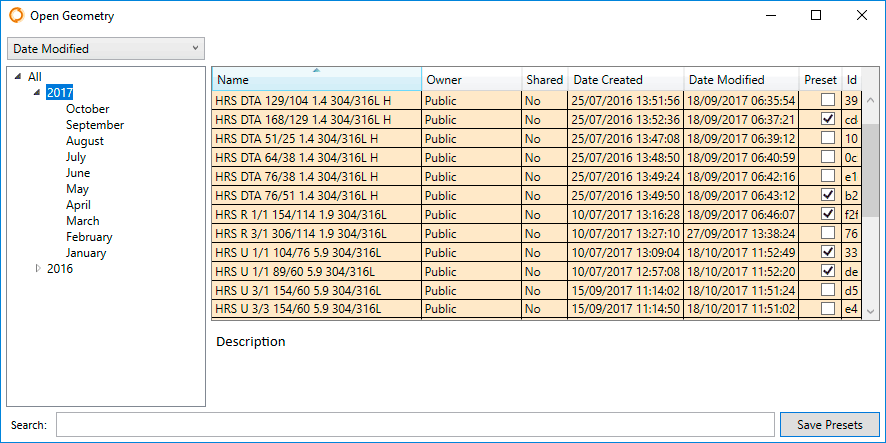
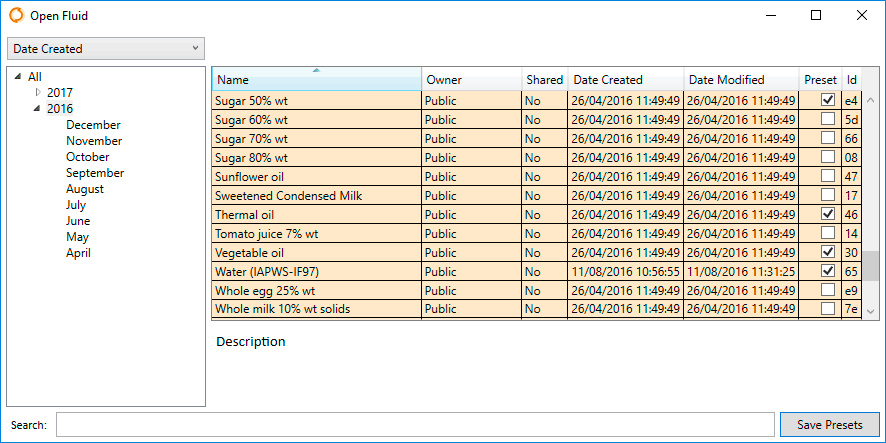
Several types of resources can be managed by the application: Projects, Fluids and Geometries
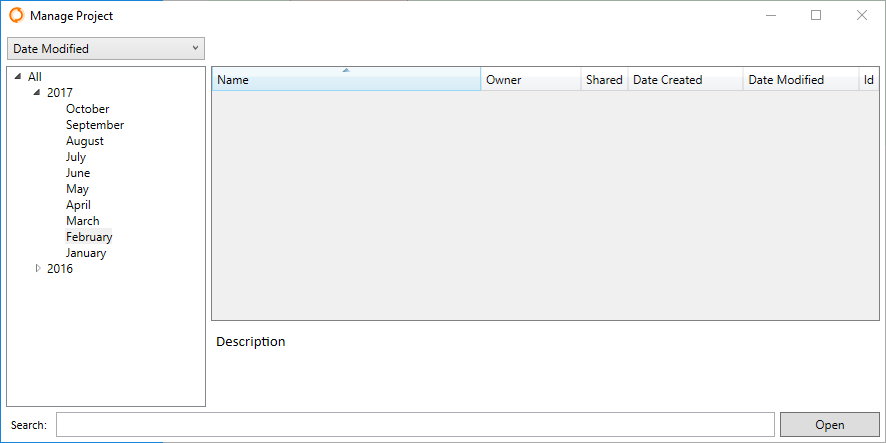
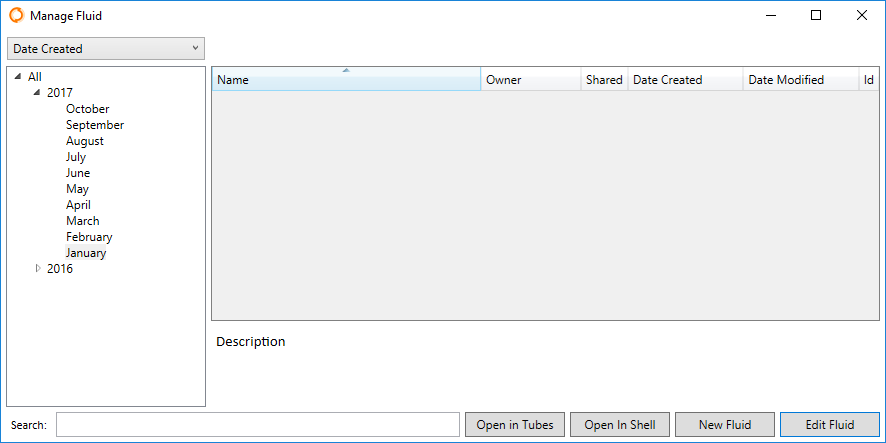
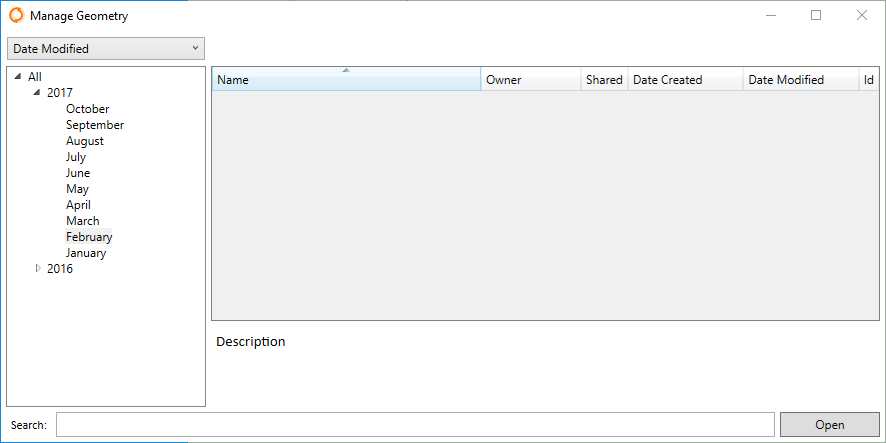
All the three share very similar dialog boxes. The slightly different one is the Fluids dialog box, since you can select to open a fluid into the tube side or the shell side, and also create new fluids an edit existing ones fluids.
At the left-top side there is a dropdown list that you can use to select the criteria to show/order the resources: you can organize them by Date Created or by Date Modified.
Right below there is a date-organized tree that you can use to ease the search of your resources and even a search box to narrow the search even more.
You can use the right-click on any resource (Project/Fluid/Geometry) so that a context menu will appear with further actions, such as: Open, Delete, Share with..., Send copy to...
All resources are stored on the server side. These cannot be stored locally on the user's computer.
The resources are color coded with the following meanings:
- White: User own resources. Resources created by the current user (his/her name will appear in the Owner column).
- Light orange: Database-wide public readonly resources. The Owner column will display Public. These resources are provided and maintained by HRS Heat Exchangers for convenience. They are standard fluids and standard model geometries. All users of the program have readonly access to them.
- Dark orange: Resources created by other users and shared with the current user. Depending on the permissions initially granted by the owner, the user could/could not modify them.
As said before, Fluids can be created, edited and saved for future use. They can also be edited within each project but, since they are then saved embedded in the project, they cannot be reused in other projects unless saved as a standalone fluid per-se. As any other resource, they are stored in the AHED Servers, not locally in the user's computer.
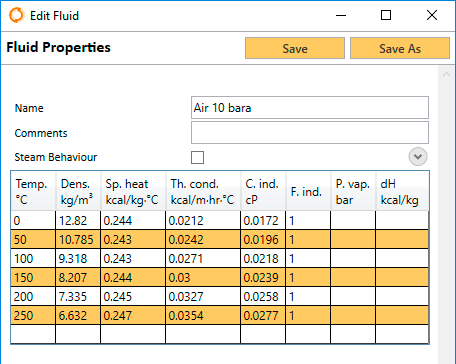
It is mandatory to fill in the Name field and at least one line of Temperature, Density, Specific Heat, Thermal Conductivity, Consistency Index and Flow Behaviour. For Fluids that can have Condensing Behaviour the Vapour Pressure and Latent Heat of Condensation values should also be inserted. For a Fluid to be used as a condensing fluid, the Steam Behaviour check box should be ticked. In that case the Molar Mass appears as an extra field and its value should also be inserted.

Light-orange coloured fluids (Public fluids) cannot be modified (edited and saved) but they can be used as a base to create your own custom fluids.
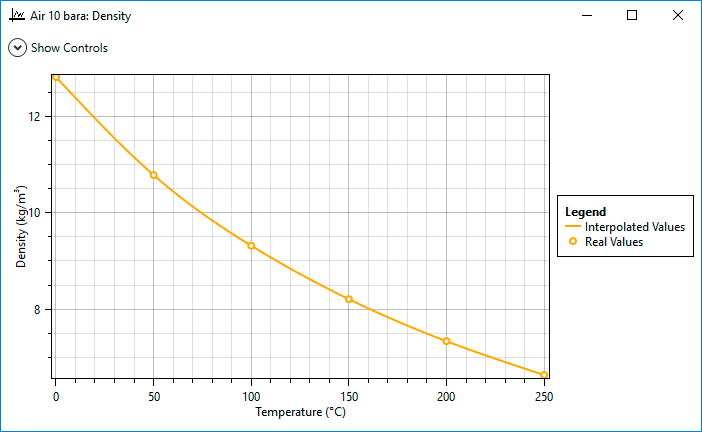
Left clicking on a column name will reorder the table based on that column (as expected). They table is usually (by default) ordered by the Temperature column.
Right clicking on a column name (other than Temperature) will show a graph representing the data in that column against Temperature. This feature can be used after the data input to quickly check for incorrect values having been inserted. They can be easily identified as spikes or weird behaviours in the line drawn. Graphs can be zoomed in/out (using the mouse scroll button), moved along their X/Y axes (using right click dragging). Using the combination Control + Double Right Click the graphs return to their default/initial view.
Use this menu to save resources to the database in the AHED Server. Please note that while editing a Project, you also have two Fluids and one Geometry embedded in it. Thus, you can use this menu to save the whole Project or to independently save the Geometry or any of the two used Fluids onto the database. Doing that will allow you to reuse them later in other Projects.
The only requirement to save any resource is that it must have a name. You cannot save an unnamed Project, nor an unnamed Geometry and the same applies for Fluids. Please note that the names of the resources in a database are not subject to the rules of file names. Since they are not files in a filesystem, but records in a database, they can have any kind of characters or punctuation marks.
Beware that they can also have colliding names, meaning that you could end up naming two different resources with the same name. If that happens the only way to distinguish them would be their Date Created, Date Modified or their internal Id. Every resource (Projects, Fluids and Geometries) have an Id, in the form of a GUID. GUID (or UUID) is an acronym for 'Globally Unique Identifier' (or 'Universally Unique Identifier'). It is a 128-bit integer number used to identify resources. For example:
5de3b14b-52bc-4e8d-9621-062d88d1a7e7
If you want to make a duplicate of a resource so that you could keep on working with it without modifying the original one, you can use 'Save as...'. The program will ask for a different Name and will assign the resource a different Id.
A list with the 9 most recently used Projects, for convenience and a quicker access to them.
Exits the program. If the current Project has been modified, it will ask for saving it first.
Tools
By using this menu, you can select a series of Geometries and/or Fluids to be preloaded and ready to be used in any Project. When used, a dialog box appears with a very similar structure to the ones under the Manage menu.
Note that a new column Preset appears. By ticking the box for each desired resource, that particular resource will become available in a Preset drop down list in the Heat Balance page (for fluids) or in the Geometry page (for geometries). This allows a quicker access to resources most commonly used. Click Save Presets button to confirm selections.
The Group Manager makes it possible to create groups of users and assign them permissions. By default no user belongs to any group. If you want to share your resources (Projects, Fluids and Geometries) with colleagues in your company, one of you must first create a group (you can use your company name as the name of the group) and then add users to that group. Be sure that no more than one user creates the group initially, since you could end up having several groups (companies) with the same name (each one belonging to the user that created the group).
Once you have agreed which user will create the group and had created it, you should fill in the Country and Description fields. The creator will initially be assigned admin rights over the group. This will allow him/her to change the Name, Country and Description fields of the group and to add new users to it. This is done through their emails. You must know the user's email in order to add that user to a group, since all users are identified through their email addresses.
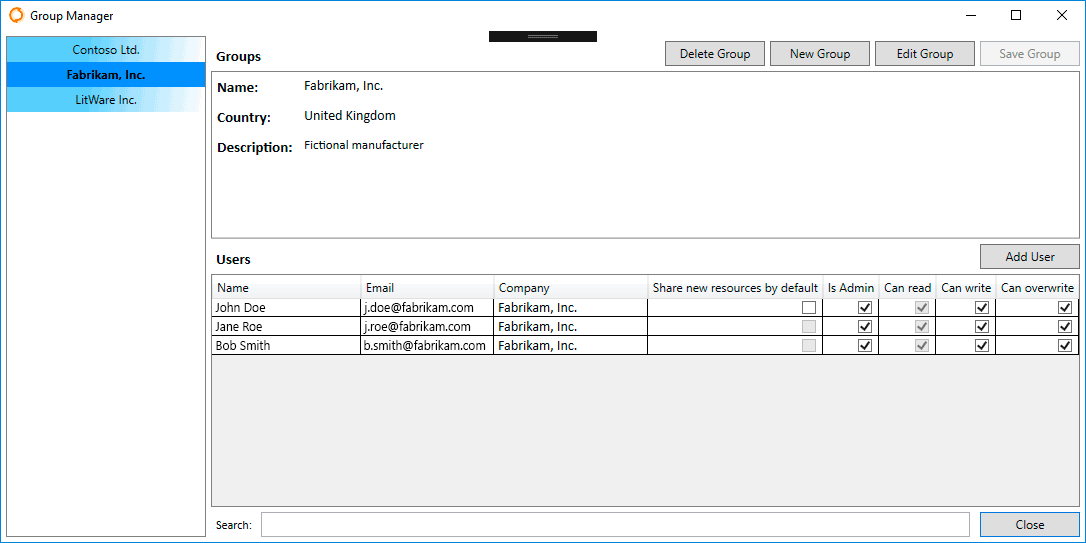
The initially designated admin (creator) can give admin rights to any other user of the group. It is even possible to revoke admin rights from oneself, as long as there is at least one more admin left in the group. At a given time, any group must have at least one admin. It is not possible to remove oneself from being the admin of a group if you are the last one. If you accidentally remove yourself admin rights, you will have to ask another admin of the group to give them back to you (obviously, you cannot give yourself admin rights not being one). Permissions are applied instantly.
By default any user belonging to a group will have read access, meaning that the user will be able to read any resource shared in that group (either Project, Fluid or Geometry) besides their own resource and the public-shared ones.
A user with write access can create new resources shared in the group. Of course, any user can create his/her own resources, but will not be able to share any resource in a group if he/she does not have this permission granted. A user does not have to be admin of a group to remove himself/herself any permission granted in that group (except the read access), but needs and admin to set them back active again.
A user with overwrite access can update resources that where not initially created by him/her (is not the owner). If a resource is shared among several groups, a user belonging to those groups just needs to have overwrite access in any of them in order to be able to update that resource.
Please note that someone with write access but not overwrite access, can read a resource, modify it and save it using Save as... for the rest of the group to read, using another name or the same. This would create a new resource and this action is allowed by the write access permission. Considering a similar scenario, a user that only has read access in a group, is allowed to read a resource, modify it and save it as a new one for his own (not shared with the group).
Finally, right clicking on a user, shows a contextual menu with a single option: Remove user. Again, anyone can remove himself/herself from a group where he/she belongs (as long as the group would not be left without any admins), but only an admin can add users to a group.
There are no specific permissions for distinguishing kinds of resources, meaning that there is no such low-level granularity in granting permissions. For instance, you cannot give a user in a group write permissions for Projects only, while read-only for Fluids or Geometries. If you give write permissions, the user can share any kind of new resources in the group.
There is an additional column called Add new resources by default which only each user can enable/disable for his/her own. When enabled, every time a user creates a new Project, Fluid or Geometry, the application automatically asks for confirmation to share that new resource in the group. If the checkbox is disabled, no confirmation is asked and the resource is created as private. In that case, if the user needs to share resources it needs to be done manually after they are created. This can be done through the proper Manage menu, right clicking on the desired resource and selecting Share with... A list of groups that the user belongs to will appear for one to select. If that particular resource is already shared in a group, it will be ticked.
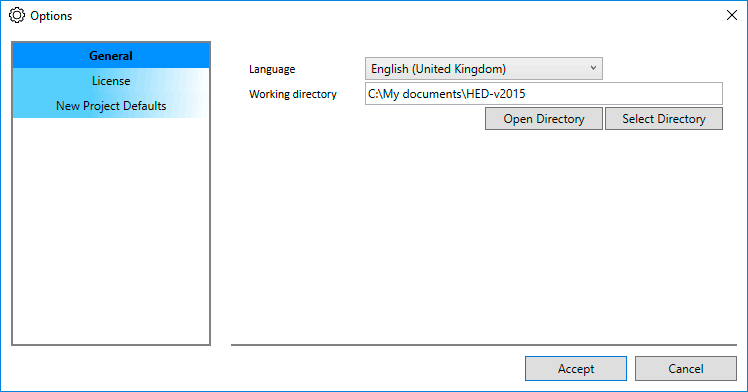
There are three different tabs in the Options page:
General: You can change the language of the application from here. You might be requested to restart the application after a language change. The application working directory is also handled here. This directory will be the one opened by default when any output is written to disk, for instance, when generating Excel reports.

License: You can handle and review your license information from here. The only fields that you can modify are your Full name, Email and Company. Be sure to fulfill them correctly when making your first license request (right after the first installation), specially your email address, since a confirmation mail will be sent to you in order to validate your email address and make sure it belongs to you. Once you had validated your email address by clicking on an link that will be provided in that email, and once our staff had approved your request and signed your license, you will be ready to use the program.
Using this option you can also check the validity of your license, see when it expires, how many API calls you have left and when it was last updated.
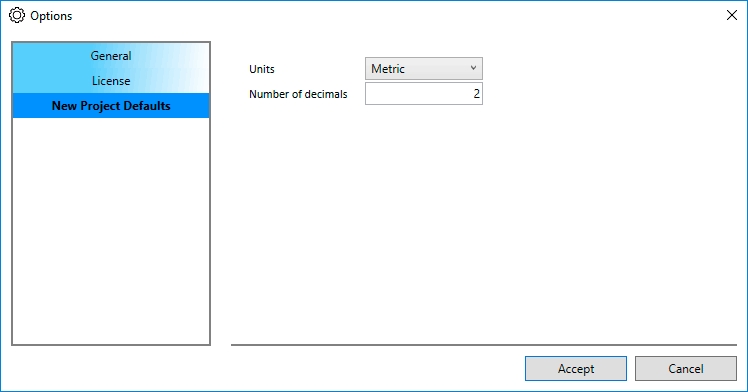
New Project Defaults: You can select the measure units to be used by the program. They can be either be Metric, SI or British. Please note that this setting only affects to the input/output of data through the user interface. The program, in order ot behave consistently with the servers performing the calculations, will always internally work in Metric units (same as the servers). Because of that, and mainly when errors occurr, some messages might be given in Metric units.
Similarly the number of decimals option only affects to the user interface. The program and servers will always perform their internal calculations using the double datatype: 64-bit floating-point values, having an approximate range of ±5.0 × 10−324 to ±1.7 × 10308 with a precision of 15-16 digits.
Help
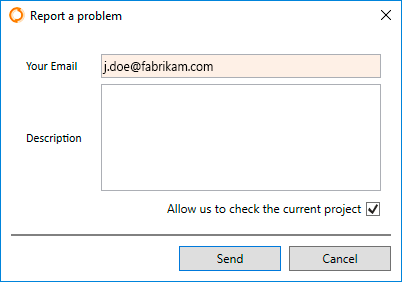
You can use this form whenever you find any issues with the program, either when you receive an unexplained error, exception, you think the program is showing wrong/inconsistent results or even if you find a warning/error not properly translated. Please provide a brief description of the problem and what you were doing when it occurred and enable the checkbox confirming that you allow our IT/Engineers to check your project in order to reproduce the problem and be able to fix it or to reply with an explanation to any doubt you might have.